
John from Canada contacted us for advice on a repair to the Quad 63 and 989. He also wanted to carry out a couple of modifications to improve the sound quality. He has included some helpful photographs and a procedure checklist. Thanks John.
We’ve copied his story below.
Over recent years I’d repaired four Quad ESL63 panel diaphragms using a home-made stretching jig. Results were mixed. Achieving the correct tension was a matter of guesswork with a good chance of either tearing the mylar or ending up with an insufficiently tensioned panel. I had also had problems with the diaphragm glue and coating I’d been supplied.
Faced with a complete overhaul of two ‘as is’ ESL 63s I’d bought, including regluing of stators as well as repair of diaphragms I decided to buy one of Rob Mackinlay’s
(E R Audio) repair kits. The decision was prompted by his very helpful answers to the queries I’d put to him before the purchase was made.
Shortly into the job, I knew I’d made the right decision. The kit he supplies could perhaps be assembled piecemeal with a lot of research and much trial and error, but what you’re paying for is Rob’s knowledge of the speakers, how to fix them, and what materials do the job. His price is reasonable, the instructions alone worth the total kit cost. Repairing these speakers is potentially a very time-consuming and frustrating process. Getting a panel back to spec involves a long sequence of critical steps and one mistake at any point can put you right back to square one. In the past I’ve had to reglue and recoat diaphragms more than once. This time both stator repair and diaphragm assembly went to plan. I also took Rob’s advice and replaced the dust covers (previously repaired with draft-excluder film) with 6 micron heat shrink.
The results are outstanding. There was not a sound from the speakers when I powered them up, until I put music on. Then I realized just how far off optimum my older set of speakers had drifted. Imaging is precise, bass extended, transients significantly improved. This has been a very satisfactory experience eased by Rob’s prompt responses to queries I’d made during the repair, including how to measure resistance without including myself in the reading!
Two tips or footnotes I would add are:
-
- Buy a multimeter capable of measuring diaphragm coating resistance. Coating must be applied thinly and with all the care in the world you’re likely to miss one or two spots, which, since the coating is clear, can’t be identified accurately without a meter.
- I found a checklist very helpful when gluing the stators. From getting everything ready, to applying the glue, to clamping (don’t forget the plastic sheet between your clamping board and the stator, or you’ll regret it!), to cleaning up ready for the next stator, it’s easy to miss a step.
Procedure for stator gluing
-
-
- Put on gloves
- Position matrix on table, solder points recessed and aligned to table gaps
- Loosen top of glue bottle
- Apply glue with roller along bars
- Apply glue along sides
- Apply glue along tops of bars with roller
- Apply glue with stick to corners of sides
- Position stator on matrix, solder points matching
- Put plastic sheet over stator
- Put clamping board over plastic sheet
- Put wood bars over clamping board and clamp down
- Hang up roller
- Close glue bottle and store upright
-
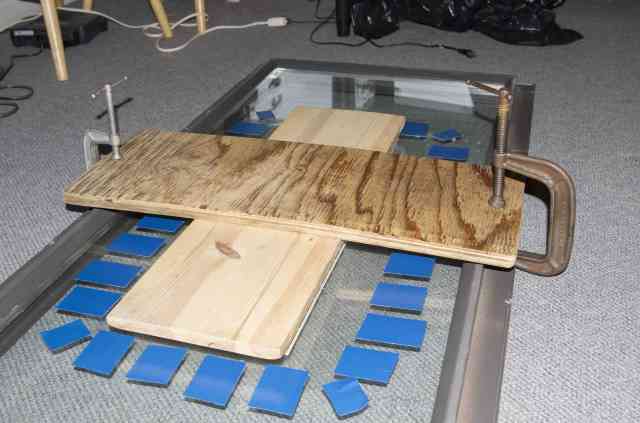
Above, a novel way of holding the panel in place on the film while the adhesive cures.
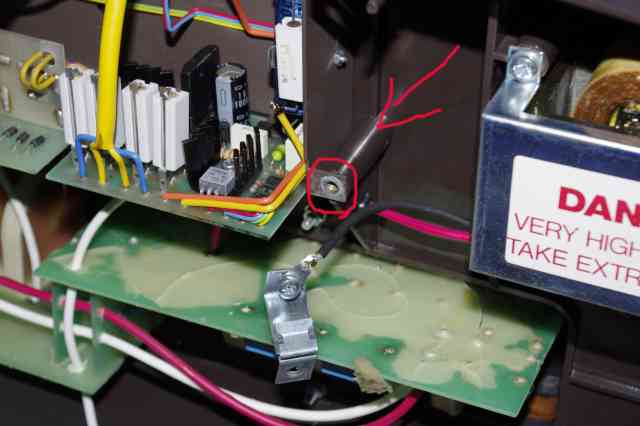
Above, the closest site for the large Mundorf M Cap is in an empty cell next to the input terminals and blue electrolytic capacitor (seen to the left, hiding behind a wire wound resistor). However, the post shown arrowed has to be cut away to allow the capacitor to fit.
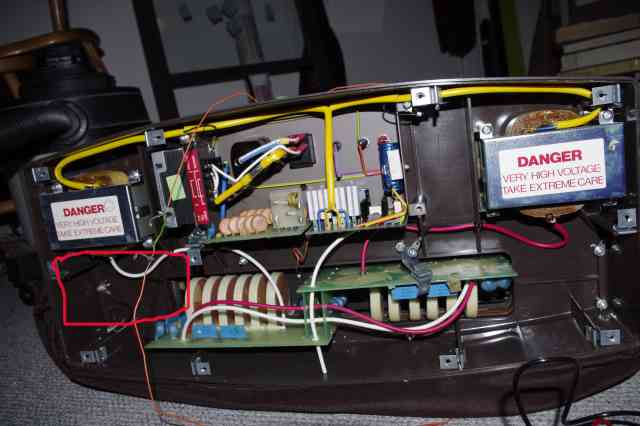
Above, a proposed site for the larger Mundorf 220uf M Cap, this involves running wires to the cap from the input connection but does not require surgery to the base.